UE Project Setup
This topic covers the steps needed for configuring an Unreal Engine scene for use with RenderStream.
Unreal Engine (UE) is a third-party game engine that can be used to create 3D scenes. Unreal Engine projects can be adapted such that they create RenderStream output streams using Disguise’s UE plugin. This plugin contains several components that enable both camera based mappings with tracking as well as non-camera based (2D) mappings (e.g. direct).
Plugins
Section titled “Plugins”-
In order to communicate with Disguise, Unreal Engine requires the installation of a plugin on the render node.
-
The RenderStream pre-packaged plugins for Unreal Engine are available in the Disguise RenderStream-UE GitHub.
-
When adding a plugin to a UE/project, it is important that it is placed in the correct location and that the folder containing the plugin files is named correctly otherwise you may encounter unexpected errors. The plugin cannot be added as an engine plugin, it must be in the project.
Unreal Engine Project Setup
Section titled “Unreal Engine Project Setup”- Launch the Unreal Engine Editor.
- Create a new Game > Blank, or Film > Blank project with default settings and ensure it is saved in:
D:\RenderStream Projects(orC:\Users\USERNAME\Documents\RenderStream Projectsif you are using a personal laptop/PC). - Open the project folder in Windows Explorer and create a new folder with the name,
Plugins. - Place the RenderStream plugin in the Plugins folder.
- Restart Unreal Engine.
- Search for CineCamera in the Place Actors panel.
- Drag and drop a new CineCamera into the scene.
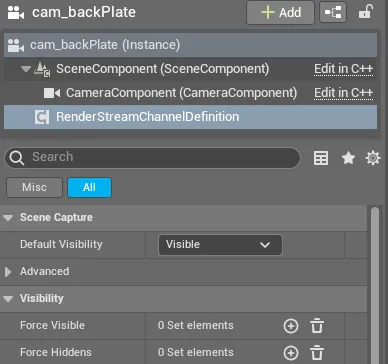
- Click the Add Component button from the Camera Actor’s Details panel and add a RenderStream Channel Definition.
- The name of the Channel in Designer will be the name of the camera actor, so name the camera accordingly.
- The setting Default Visibility defines whether the camera will see most actors in the scene.
- Open Window > Message Log > RenderStream Validation and resolve the issues mentioned on the window, these are based on nDisplay limitations/features. Resolve these settings and save the scene making sure the notification has disappeared from the list.
- [Optional] Force the visibility of select Actors within the Camera’s Channel Definition (useful for splitting content between the front and backplates): If you wish to add multiple Actors to a visibility set at the same time, lock the current selection into the Details panel, select the Actors you wish to add either from within the scene or the Inspector panel, right-click the visibility set you wish to add the Actors to, and select Add from Selection.
- [Optional] To make Unreal Engine run at full speed when out of focus go to Edit → Editor Preferences and untick “Use Less CPU when in Background” (search “cpu”).
- Save the project.
Unreal Editor or Packaged Build?
Section titled “Unreal Editor or Packaged Build?”The standard RenderStream workflow operates directly within the Unreal Editor, which offers flexibility and rapid iteration. However, as of July 2025, a new option is available directly from the UE Editor’s Viewport Toolbar. This feature allows you to build and package your project into a standalone executable (.exe) for use with RenderStream, which can offer performance benefits and a more streamlined deployment.
When the build process is triggered, two .exes are generated by Unreal. One is a launcher, and the other is the actual project, which has a longer binary and will be nested in the Binaries folder. They will both appear in RenderStream’s asset discovery.
![]()
There are some prerequisites to building a project that need to be observed before using this method:
-
Environment Setup: Install Visual Studio Community 2022 and select the “Game development with C++” workload during installation, as this automatically includes the correct Windows SDK needed to build your project for Windows 10 and Window 11.
-
Project Configuration: Inside the Editor, go to Project Settings to configure the core packaging rules. Here you must Set Default Maps, and under the Packaging section, choose your Build Configuration (e.g., Development or Shipping), explicitly list all Maps to Include in the build, and confirm Windows as the target platform.
-
Asset & Lighting Finalisation: With the settings configured, finalise all project data. This involves ensuring all shaders are compiled and, if you are not using Lumen, select Build Reflections. It’s important to Rebuild Lighting on “Production” quality if you are using baked lighting. Alternatively, select Build All Levels to update everything at once.
-
Final Save & Build: Finally, perform a Save All to make sure every change is committed. After saving, you are ready to initiate the final build process.
For a more detailed explanation of the packaging process and the differences between engine versions, please consult the official Unreal Engine documentation.
Useful Unreal Engine Information
Section titled “Useful Unreal Engine Information”Saving a project
Section titled “Saving a project”Unreal Engine has several methods for saving a project. When making changes to a project for use with RenderStream, it is best to close the project before attempting to start a workload. This will prompt you to save all changes to your project. If your Unreal Engine project is not saved correctly, you may experience unexpected behaviour.
Blank GAMES project or blank FILM project?
Section titled “Blank GAMES project or blank FILM project?”Note that a key difference between a blank GAMES project and a blank FILM project is the way that project manages the skybox. A Games project has an auto-updating skybox relative to the sunlight (Directional Light) for a day/night cycle, but a film project has a refresh material button for updating the skybox relative to the sunlight.